| OnScreen: for Windows; On-Screen Keyboards with Assistive Technology; Version 1.80; User's Guide | ||
|---|---|---|
| Prev | Next | |
The scanning capabilities of OnScreen provide a single-click option to access all panels and keys. To address different user capabilities, these settings provide both basic and advanced options. In most cases, the Scan Delay setting (which controls the scanning step speed) will be sufficient for basic users. If a second button is available (e.g. the Right-Click), there are several options available to control scanning actions when the right-click button is pressed. The Scan Overlay display controls the basic color (color inverted, black, or white) and the transparency level.
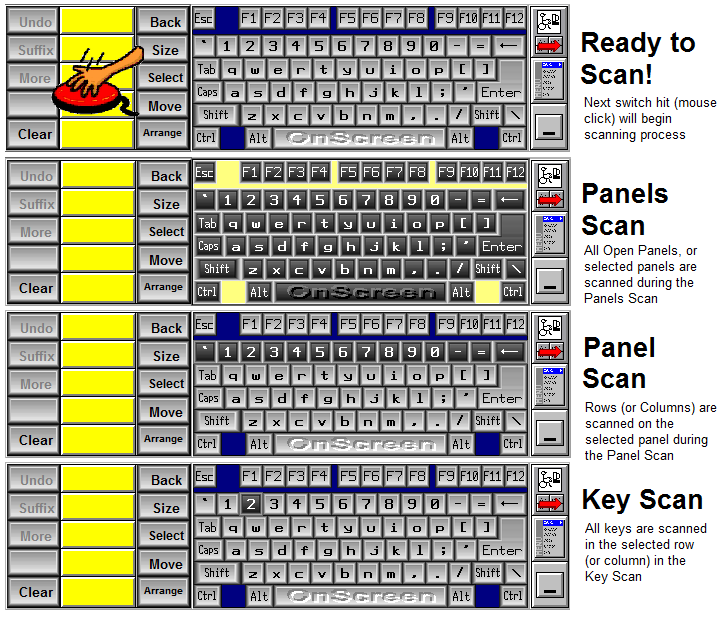
OnScreen uses a "Ready to Scan!" image of a hand over a large red switch to indicate scanning is enabled and ready to start. The first switch hit (mouse click) will begin the scan process. The Ready to Scan image always overlays the first panel to be scanned.
As an aid to trainers, there is a physical keyboard based shortcut Alt-X that will toggle scanning (when scanning is already enabled in OnScreen Setup). This can be convenient to use to cancel scans to adjust scanning settings (during scans the mouse cursor gets locked into the area being scanned). For users that need more control while scanning, the Right Click Mode of "Up one Scanning level" is the best option, since scans & scanning can be backed out by right-clicking.
The scanning implementation within OnScreen uses a transparent overlay window to identify the scan area. There are 3 scanning levels (where the term level refers to the particular scanning mode). Panels are scanned, and once a panel is selected, the next level is a panel scan, which scans groups of keys (typically ordered as rows or columns). When this scan group is selected, the lowest level scans the individual keys in the group. These 3 levels are:
Panels Scan
Panel Scan (Rows or Columns)
Key scan (individual row or column scan key by key)
The Panels Scan goes panel by panel as determined in the Panels to Scan section. The scan order is determined by the order of the panels in this list. If a Panel is to be scanned, but it is closed, it is skipped. If all Panels to Scan panels are closed, scanning will be stopped.
The Panel scan (by rows or columns) scan is determined by settings in the OnScreen Initialization file. In most cases, this uses a top to bottom row scan, with some modification based on the panel itself. For the WordComplete panel, a column scan is used, as this is more effective for accessing the WordComplete candidates. See Advanced Notes below and the Initialization File Documentation for further details on modifying the panel scan.
The Key scan (or individual row or column scan) goes key by key in the order predetermined in the OnScreen Initialization file. The design is extremely flexible, and final key scans can be in any order (i.e. left to right/right to left/top to bottom/bottom to top, or even can be alternated from outside to the middle).
Advanced Notes: The Panels to Scan determine which panels will be scanned, and can be set in any order by manipulating the available panels and the Panel to Scan in the list boxes. Each Panel scan is determined by settings in the Initialization file, and uses a list of individual keys, separated by commas, grouped by semi-colons. These settings determine the groupings of keys that define a row (or column). Once a Panel scan is selected, the lowest level Key scan is determined by the order of keys listed in the key grouping. For example, a 1,2,3; will group keys 1-3, and key scan left to right. A 3,2,1; entry will panel scan the same group, but key scan right to left. For Text-To-Speech announcements, a word or phrase in square brackets can be inserted prior to the key listing. For example, instead of 1,2,3; you can list [First Row]1,2,3; and "First Row" will be announced when Text-To-Speech is enabled in Sounds. For more details, refer to the panel scan settings in the Initialization File Documentation.
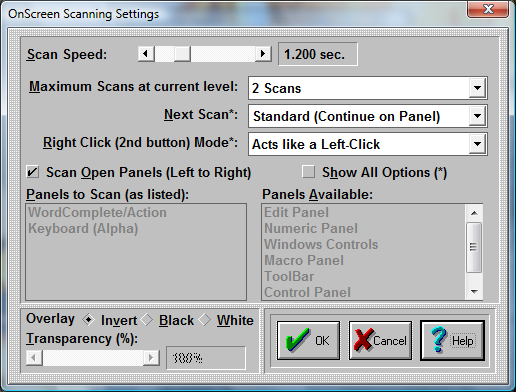
Scan Operation Settings
Scan Delay
The Scan Delay determines the amount of time between each "Scan Event" - panels, panel scan (row/columns), and key scans. You can use the scroll button to select between 0.05 seconds and 5 seconds. The scan delay time is displayed to the right of the scroll bar. If Step Scan is selected in the Right Click Mode, then this setting turns into a Timeout After setting, and the time is used as a delay period - if nothing happens in the delay period, then the scan reverts up one level.
Maximum Scans at current level
You can select No Maximum or 1, 2, 3, 4, 5, or 6 scans. When No Maximum is selected, each scan level will continue until a left-click goes to the next level (or selects the key), or a right-click changes the scan level or stops the scanning. If a number of scans is selected, the current scan level will continue for that number of scans, and then the scan level will revert up to the previous level. If the Panels scan reaches the maximum scans, the scanning will stop (leaving the transparent overlay on top of a panel - to restart scanning, left-click on the scan overlay). Note that "No Maximum" is not allowed when there is no Right-Click option available.
Next Scan
(the * indicates this option is only shown/available when Show All Options is On)
After a scan is completed (i.e. a key is selected during a key scan), the default action is to return up one level, and continue scanning the same panel - this is the normal action - "Normal (Continue on Panel)". If the key scan option is selected ("Re-Scan Current Keys"), the same group of keys will be scanned again after a key selection. The panel scan option ("Scan Current Panel") has a different internal setting, but is effectively the same as the normal action - continue scanning the same panel. The final option "Scan All Panels" will return to the top level, or Panels scan after a key is selected by the left-click, and show the "Ready to Scan!" image.
"Standard (Continue on Panel)" - this continues scanning the current panel just scanned. For typing, this mode works best, since the user can focus on the keyboard panel while selecting letters. This also works best when the Right Click Mode (see below) is set to "Up one scanning level"
"Re-Scan Current Keys (*)" - this continues scanning the same row (or column) just scanned. This is only shown when "Show All Options" is On.
"Scan Current Panel (*)" - this continues scanning the same panel just scanned. This is only shown when "Show All Options" is On.
"Scan All Panels" - this resets the scan and shows the "Ready to Scan!" image after a completed scan.
Right Click (second button) Mode
(the * indicates this option is only shown/available when Show All Options is On)
If there is no right-click available, or the user cannot effectively use a second button (right-click), the not available option is recommended ("None (no Right-Click available)"). This forces the "Maximum Scans" setting to 2 scans if set at No Maximum - No Maximum is not an allowable setting when the right-click setting is set to None (otherwise a complete scan would be required during every scan, which could be problematic in various situations). Detailed notes on each Right-Click setting are outlined below.
"None (no Right-Click available)" - the right-click is not used and it is ignored for scanning operations
"Scan All Panels (top level) (*)" - a right-click resets the current scan level to the top level (or Panels scan) This is only shown when "Show All Options" is On.
"Up one scanning level (*)" - this is the default setting, and it reverts the current scan up one level. A right-click while at the Panels scan stops the scan process, leaving a transparent overlay over one panel (left-click to restart scanning). While stopped, another right-click will clear the panel off of OnScreen entirely - see "Accessing OnScreen during a paused scan" below. This is only shown when "Show All Options" is On.
"Pause Scanning (*)" - this will immediately stop (or pause) the scanning at the current level (left-click to restart scanning) This is only shown when "Show All Options" is On.
"Step Scan" - The step scan option provides a controlled scan, using the right-click as an advance (rather than a time based approach (e.g. Scan Speed)). This option creates several interface setting changes, and the scan operation itself requires 2 buttons to scan - right-click advances, left-click selects. To reset or cancel this mode, a Timeout After setting appears where the Scan Speed setting was (and is set to 3 times the current scan speed), and the physical keyboard is monitored for a Ctrl-Alt combination keypress. The timeout timer always starts after any left or right-click. If the timeout period expires, the scan will revert up one level (see "Up one scanning level" above). Once at the Panels scan, after the timeout after period expires, the scan overlay will disappear - right-click anywhere on OnScreen to restart. (Note this effectively bypasses any other right-click setting in Mouse Buttons when in the step scan mode) This also enables a physical keyboard monitor, so when the Control Key and the Alt key are pressed simultaneously, the scan mode will end & the scan overlay will disappear - right-click anywhere on OnScreen to restart. When this mode is selected, the "Maximum Scans at current level" is automatically set to No Maximum.
"Abort Current Scan" - a right-click will abort (or cancel) the current scan, and reset based on the Next Scan setting. If at the top level Panels scan, a right-click will stop (or pause) scanning. In other words, this acts as if the scan was completed & resets based on the Next Scan setting, as if a final key press occurred (e.g. the scan resulted in key selection).
"Exit Scan Mode" - in this mode, a right-click will disable scanning entirely (to re-enable, you must return to User Options in OnScreen Setup)
"Acts like a Left-Click" - in this mode, a right-click will act exactly the same as the left click - selecting the current highlighted item
Accessing OnScreen during a paused scan: When at a stopped (paused) scan for "Up one Scanning level" or "Pause Scanning", and additional right-click will move the scanning overlay off of OnScreen, and place it above or below OnScreen (based on current screen position). This will display a message "Left Click Here to Start Scanning", and change the transparency to mostly opaque. When clicked on, normal scanning will occur (the same as a left-click during a paused scan, i.e. when the overlay is over OnScreen). If OnScreen is moved, the overlay will reset & display over OnScreen Use a Left-click or Right-click to reset as desired.
Operation Notes: The final selection of a key during the Key scan sends a mouse button down/up event message from the scanning window to OnScreen. This is based on the cursor position (which is towards the bottom right of the scan area). Therefore, it is important that the Key Border option in Operation Options be set at 0 when keyboard scanning is used, otherwise it may conflict with the valid area a mouse click is accepted within OnScreen.
On the toolbar, the 3 buttons are grouped in 2 sets of 2 buttons (with the menu button being shared), so there is a visual action during the Panel Scan. In use, the menu button results in a menu being shown, which cannot be scanned by the user, and the minimize button minimizes OnScreen, disabling the scan entirely, so neither of these buttons is a good choice for the scanning user. Therefore, if scanned and selected, the menu and minimize buttons resets the scan to the top level.
If the scan is stopped, the scan overlay will be hidden during OnScreen move, resizing, or reconfiguring. If OnScreen is minimized, scanning is stopped. When OnScreen is opened from a minimized state, if scanning is enabled, it will automatically be started once OnScreen is displayed in its opened state.
Scan Open Panels (Left to Right)
When this option is set On, scanning will always use a left-to-right approach, and will scan all open panels. To customize the panels and/or order, you must clear this option, and use the "Panels to Scan" list below. This setting also has a subtle operational approach difference - when Scan Open Panels set On, and scanning is enabled, when OnScreen is started (with keyboard scanning enabled), the scanning will be in a stopped mode, waiting for a switch hit (mouse-click) to begin. If Scan Open Panels is NOT selected, and OnScreen starts, scanning will automatically start.
Show All Options (*)
This affects the 2 drop down lists "Next Scan" and "Right Click (2nd button) Mode". When Show All Options is On, additional items are added to the lists of available options. When Show All Options is cleared, the most common options are shown. Note the order of items also changes when Show All Options is On.
Panels to Scan
Panels to Scan (as listed)
The Panels to Scan shows the panels to scan (in the order listed). To remove a panel, double-click or highlight and press the Space bar. By removing and adding panels, and order of Panels to scan can be selected. The final list will indicate the panels and the order that they will be scanned, during the top level Panels scan.
Panels Available
The Panels Available show the panels that will NOT be scanned. Double-click or highlight and press the Space bar to select the panel, and place it at the bottom of the list in Panels to Scan.
Scan Overlay Display
Overlay (overlay color)
The scan overlay uses a transparent overlay that outlines (or highlights / indicates) the scan area. You can select this color by selecting the Invert, Black, or White options. The Invert option (default) uses an opaque window (Transparency automatically set at 100%), and inverts the current OnScreen display using built-in display options to invert the current display colors (this is useful for high-contrast viewing). When Black or White is selected, the transparency is set at a much lower level to make a translucent overlay. For Black or White, a fairly low transparency level is recommended (note a completely opaque overlay prevents viewing the keys, so some level of transparency below 100% must be selected for effective scanning). Whenever one of these overlay options is selected, the transparency level is automatically selected for the current selection to a recommended setting. After selection, you may change the transparency level to your desired level.
Note: When Invert is selected as the overlay option, you will obtain different results for the scanning overlay based on the current selected colors & display options. See Colors for OnScreen display options.
Note: When Invert is selected as the overlay option, be sure to disable the "Highlight Key under pointer" option in the Enhance display options, otherwise key scans will be inverted twice, and the Key scan will not be effective.
Transparency
The Transparency level (%) determines the transparency of the overlay that outlines (or indicates) the current scanning area. It is recommended 25% to 50% range be used for black or white, and for invert this option is disabled. If the transparency level is set too low, the scanning area may not be easily discernible, and if the transparency level is too high for the black and white options, the opaqueness will prevent seeing the underlying keys/scan area. Note the connection between this setting and the overlay technically means this is an opaqueness setting, but transparency is a better understood term.
As seen in ...
