| Joystick-To-Mouse: for Windows; Run Windows with a Joystick!; Version 2.80 Release 6; User's Guide | ||
|---|---|---|
| Prev | Chapter 4. Advanced Menu Options | Next |
Click on a control or button for detailed help, or review descriptions below.
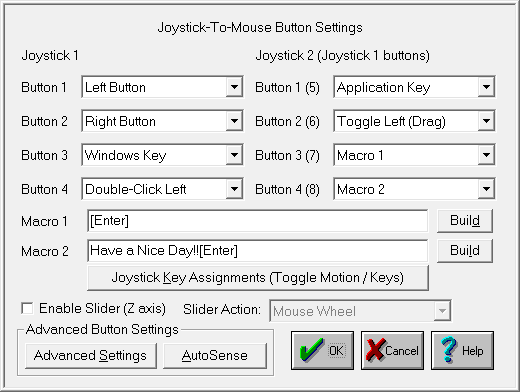
Button Settings
Joystick-To-Mouse has the ability to assign different actions to the Joystick Buttons. Most Game Port joysticks only have 1 or 2 buttons. Joystick-To-Mouse allows up to 4 button settings per joystick (for buttons 5 through 8, and 9 through 32 see Advanced Settings). Button settings for joystick buttons that do not exist will not affect anything. The default settings are for Button 1 to be the Left Button of the mouse, and Button 2 to be the Right Button. Use the drop-down list to view all available button settings, and select which action should be triggered when the corresponding button is pressed on the Joystick. See below for a list of available Button Settings (Notes on these settings are available in the Advanced Settings).
It is important to note that Joystick-To-Mouse does not affect the performance of the Mouse - both the Mouse and the Joystick can work together. Also, in order for Windows to recognize the mouse driver (in most cases), an actual mouse must be connected to the appropriate port on the computer.
The Macro 1, Macro 2, and Joystick Key Assignments are NOT displayed unless one of the Joystick Buttons is set to the corresponding settings - they are only displayed if needed.
Macro 1 / Macro 2
The Keyboard Macro capability allows a macro string of keystrokes to be triggered by a joystick button press. When recording a keystroke macro, you must enter the keystrokes exactly as they would be typed on the physical keyboard.
The Build Button opens the Build-A-Macro screen which offers various utilities & functions to help create a keystroke macro.
For additional keyboard support, contact Innovation Management Group, Inc. about their My-T-Soft® family of products, which provides on-screen keyboard layouts in addition to other important utilities.
Joystick Key Assignments
This option only applies to Relative Mode operation.
The Toggle Motion / Keys allows the joystick to act as a pointing device, and then act as a keyboard device by using one of the Joystick buttons as a toggle between these modes. When acting in the Keys Mode, the actual keystrokes may be modified in Joystick Key Assignments).
Automatic Button Press (Dwell)
This option only applies to Relative Mode operation.
If this option is Enabled, then the following happens: Any joystick motion enables a button press after the joystick is idle (at the center position) for the delay period. In use, this means that the user will move the mouse cursor to a position, and return the Joystick to the center position, then the delay period will begin. If there is no motion (Joystick remains at center position) during the delay period, a button press will be sent at the end of the delay period.
The Delay period can be set from a very brief 20 ms (0.02 seconds) to 5 seconds in 20 ms increments. The default value is 1/5 seconds (0.20 seconds). Note that in older versions of Windows the delay may be slower than indicated due to lack of precision in the system timers available in those versions.
The default button press corresponds to Button 1 for Joystick 1. Refer to Joystick-To-Mouse Notes for information on how to change the default button, or review Advanced Settings).
Enable Slider (Z Axis)
This control is sometimes referred to as a slider, throttle, or the Z Axis. It is important to note that sometimes the Z axis & Rudder controls have their names swapped within the joystick driver or in a particular game. For Joystick-To-Mouse, this setting refers to the control on your joystick that creates joystick messages which are sent as Z Axis joystick motion messages - whichever control on your joystick creates these messages is the control that this setting affects. In other words, if the naming in the control panel applet conflicts with the names in Joystick-To-Mouse, don't worry too much about it, but be aware of which control on your joystick this setting affects.
When Enabled, use the drop-down selection box to select which action the control will have.
The following actions are available:
NOTE: For all these actions, moving the control slowly generates more events than moving quickly - see below for further details.
Horizontal Scroll
When an application has a horizontal scroll bar (along the bottom of the window), this setting will allow you to scroll left or right by moving the control. If there is no horizontal scroll bar, then no actions will occur.
Vertical Scroll
When an application has a vertical scroll bar (along the side of the window), this setting will allow you to scroll up or down by moving the control. If there is no vertical scroll bar, then no actions will occur.
Mouse Wheel
This will generate Mouse Wheel Up and Down motion as the control is moved.
Fine Tune X Position
This will move the cursor left or right as the control is moved.
Fine Tune Y Position
This will move the cursor up or down as the control is moved.
Mouse Wheel (+ Auto)
This is the same as the Mouse Wheel, but when the limit is reached, movement will automatically continue in the same direction. Note that some joysticks have problems with this setting and will automatically drift when this control is untouched - if you experience this, do not use the + Auto setting.
Fine Tune X (+Auto)
This is the same as the Fine Tune X Position, but when the limit is reached, movement will automatically continue in the same direction. Note that some joysticks have problems with this setting and will automatically drift when this control is untouched - if you experience this, do not use the + Auto setting.
Fine Tune Y (+Auto)
This is the same as the Fine Tune Y Position, but when the limit is reached, movement will automatically continue in the same direction. Note that some joysticks have problems with this setting and will automatically drift when this control is untouched - if you experience this, do not use the + Auto setting.
All of these controls use a relative motion approach to trigger the selected action. Because various joysticks have different capabilities & precision, you will find that in use, moving the control very slowly will generate more motion then a sudden quick movement. Because these controls have limits (unlike a wheel), there will be a point where you can no longer go in the same direction - to reset, quickly move the control to the opposite extreme, then continue in the same direction by a slow & steady motion. This approach was adopted to allow additional capabilities while using these settings (i.e. a slider is not a wheel, and the physical limits of the device must be accepted (to keep your joystick in good working order!)).
There is a known operational issue with the Z-Axis - see Joystick-To-Mouse Operation for more details.
Advanced Settings
The Advanced Button Settings has several Options that even Advanced Users may never need.
AutoSense
The AutoSense Attachments allow new button settings to be Assigned on-the-fly, or to automatically Stop Joystick-To-Mouse when certain Applications are run.
The following lists all available Button Settings:
Left Button (default Button 1)
Right Button (default Button 2)
Middle Button
Toggle Left (Drag)
Toggle Right (Drag)
Toggle Middle (Drag)
Double-Click Left
Double-Click Right
Double-Click Middle
Move Cursor Left (X)
Move Cursor Right (X)
Move Cursor Up (Y)
Move Cursor Down (Y)
Toggle Speed
Toggle Speed/Click
X1 Button (Backward)
X1 Button Toggle
X2 Button (Forward)
X2 Button Toggle
Wheel Down
Wheel Up
Toggle Motion / Keys
Macro String 1 (default Button 3)
Macro String 2 (default Button 4)
Enter Key
Escape Key
Tab Key
Space Bar
BackSpace Key
Up-Arrow
Down-Arrow
Left-Arrow
Right-Arrow
Insert
Delete
Home
End
Page Up
Page Down
F1 (Help)
F2
F3
F4
F5
F6
F7
F8
F9
F10 (Menu)
F11
F12
Shift Key Toggle
Ctrl Key Toggle
Alt Key Toggle
Ctrl-Ins (Copy)
Shift-Ins (Paste)
Shift-Del (Cut)
Ctrl-X (Cut)
Ctrl-C (Copy)
Ctrl-V (Paste)
Ctrl-Del (Clear)
Ctrl-W (Close)
Ctrl-Z (Undo)
Alt-Backspace (Undo)
Alt-F4 (Close Window)
Alt-Tab (Next App)
Alt-Esc (Find App)
Alt-Space (System Menu)
Alt-Y (Yes)
Alt-N (No)
Shift-Tab
Shift-F4 (Tile)
Shift-F5 (Cascade)
Ctrl-F4 (Close Child)
Ctrl-Tab (Select Child)
Ctrl-Esc (Task List)
Ctrl-Space
Ctrl-Backspace
Ctrl-Enter
Ctrl-Home
Ctrl-End
Ctrl-Page Up
Ctrl-Page Down
Ctrl-Up
Ctrl-Down
Ctrl-Left
Ctrl-Right
Ignore Button Press
Windows Key
Application Key
Button Settings Notes
The Drag settings (Toggle Left/Middle/Right) treat a joystick button press as a toggle button down / toggle button up. This can be used for Drag, because you select an item (joystick button down, and it stays down), then you move the joystick (which drags the item, since the button is down), and then the next joystick button press toggles the down button up (release), which drops the item.
The Move Cursor options allows you to move the mouse cursor via button presses, which can be helpful for fine tuning, or alternate approaches.
The Toggle Speed options toggles normal (based on your current settings) and a slow mode (very fine tune selection). The Speed/Click option includes a left button down/up sequence while in slow mode, allowing you to press the joystick button once (go into slow mode), then Click (and return to normal speed).
The X1/X2 buttons are on some mouse devices, and may be used in games, or browsers, providing additional navigation ability. The application must support these buttons / events to make these settings useful. For example, Microsoft's Internet Explorer uses these for Back/Forward navigation.
As seen in ...
